


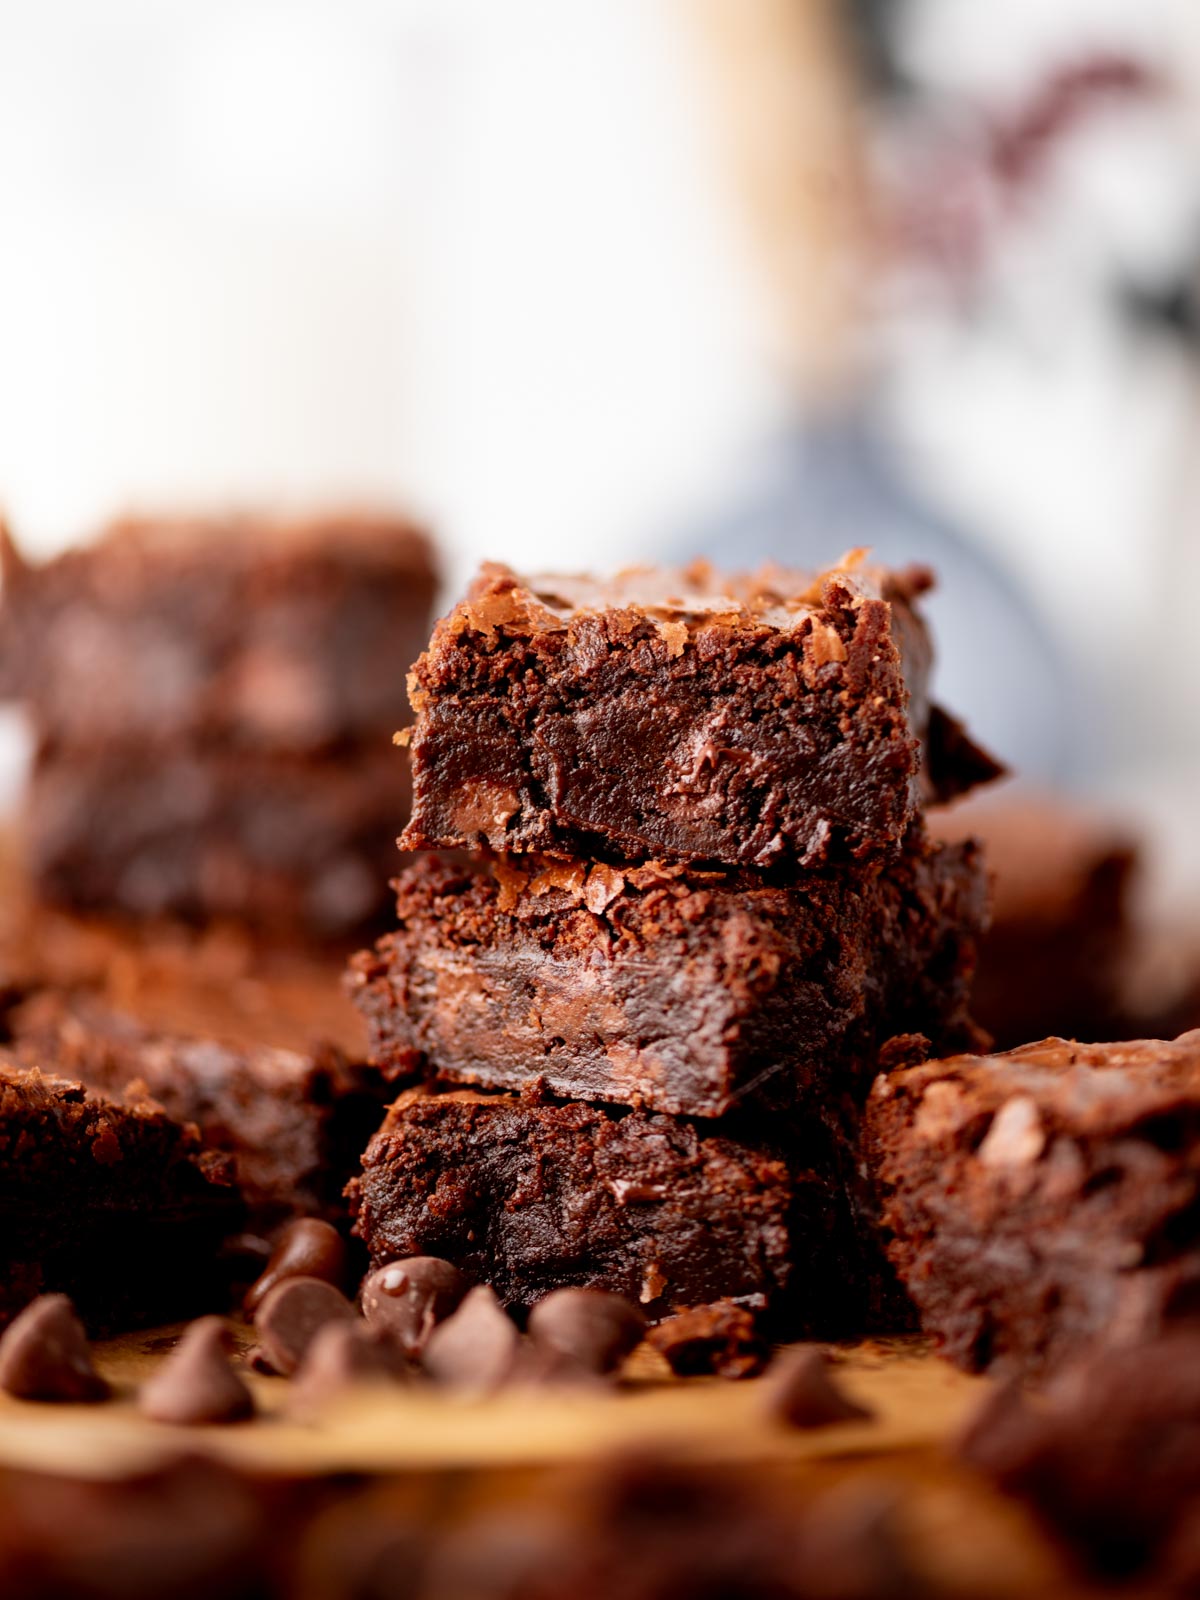
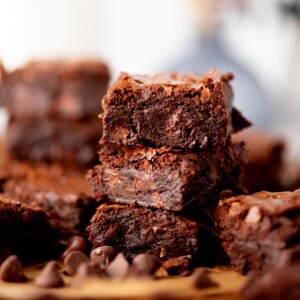
That crackly top and fudgy center you’re always chasing in a brownie? This recipe nails both. A couple of steps that look small are the whole reason, and they’re worth it. Chewy edges, soft fudgy middle, deeply chocolatey, and just as good on day two. Bring these once, and you’ll never be able to show up empty handed again.
Brownies seem simple, but they’re one of those recipes where the small details are the whole difference between fudgy and cakey, crackly top and flat, good and really good. After a lot of testing and tweaking, this version gets all of it right.
What you’re getting here is chewy edges, a soft fudgy center, and that signature crackly top. Every single element of this recipe was tested intentionally, from the chocolate combination and ingredient ratios to the whisking method, bake time, and pan type.
And yes, the pan matters more than you’d think! I tested metal, glass, and ceramic at different temperatures and bake times so that no matter what you’re working with, you have what you need to pull these off perfectly every single time.
Why These Are The Best Fudgy Brownies
- That crackly, glossy top
That thin, shiny layer on top isn’t luck. It comes from properly beating the eggs and sugar. It gives you that bakery-style finish that makes these brownies look just as good as they taste. - Chewy edges with a fudgy center
You get the best of both worlds here. The edges have just enough chew, while the center stays soft and rich without being underbaked or messy. - Deep chocolate flavor
A combination of cocoa powder and melted chocolate gives these brownies a richer, more layered chocolate flavor. There’s also a small amount of espresso powder that enhances the chocolate without adding any coffee taste. - Simple ingredients and no complicated steps
No mixers required and nothing fussy. Everything comes together in two bowls with ingredients you likely already have on hand. - They stay soft and fudgy for days
Thanks to the balance of butter, oil, and sugar, these brownies don’t dry out the next day. They’re just as good (if not better) after sitting.
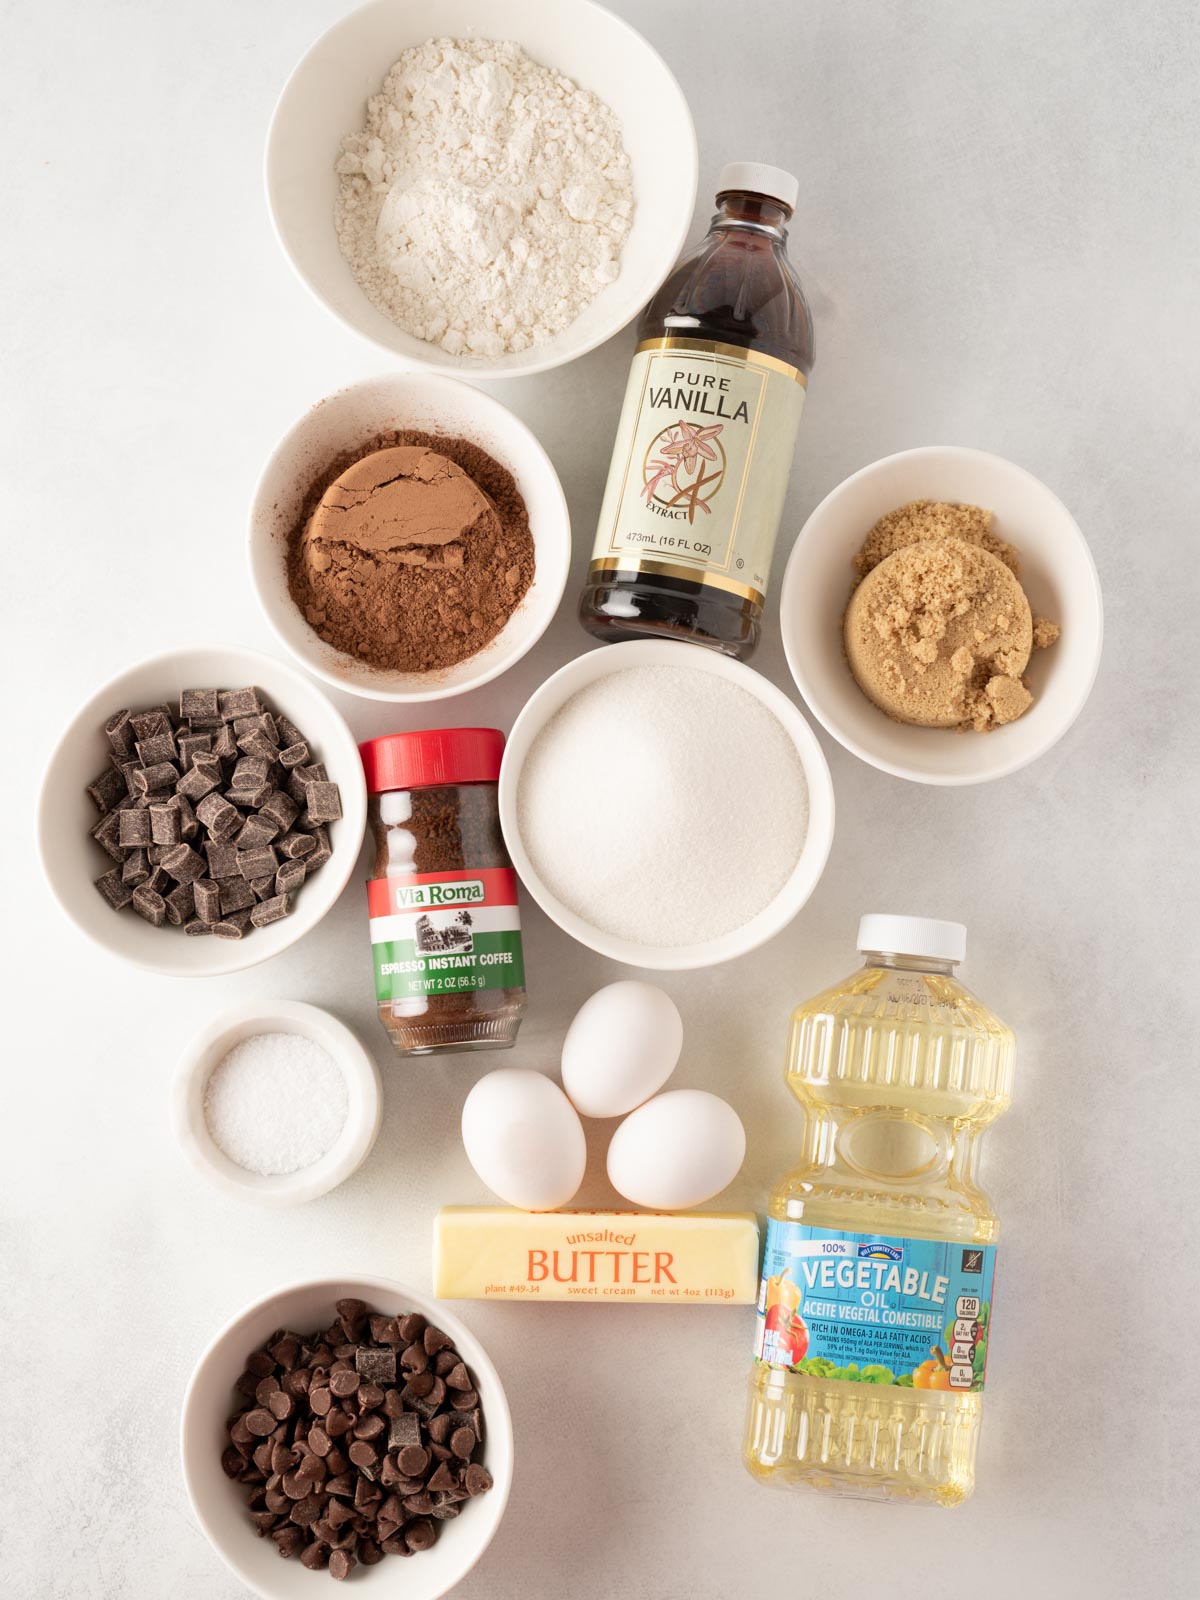
Ingredients You’ll Need
- Unsalted butter – Melted butter gives these brownies that rich, classic flavor. Using unsalted lets you control the salt level so the chocolate really shines.
- Neutral oil (vegetable or canola) – Just a small amount keeps the brownies soft and moist, even after they’ve cooled. This is one of the keys to that fudgy texture that lasts.
- Granulated sugar – This is what helps create that signature crackly, glossy top. It also gives structure to the brownies.
- Light brown sugar – Adds flavor and helps create that chewy texture, especially around the edges.
- Eggs + egg yolk – The eggs give structure, while the extra yolk adds richness and helps keep the center soft and fudgy. You’ll notice a similar method in my chewy chocolate chip cookies.
- Vanilla extract – Rounds out the chocolate flavor and adds warmth without overpowering.
- Espresso powder – Trust me, this doesn’t make the brownies taste like coffee. It simply makes the chocolate taste richer.
- Unsweetened cocoa powder – Gives the brownies that deep chocolate base and helps create a dense, fudgy texture.
- Semisweet or bittersweet chocolate – Melted into the batter for extra richness and a more layered chocolate flavor.
- All-purpose flour – Just enough to hold everything together without making the brownies cakey.
- Salt – Balances the sweetness and brings out the chocolate flavor. I always recommend coarse kosher salt.
- Chocolate chunks or chips – These melt into little pockets throughout the brownies, giving you that extra gooey chocolate in every bite.
- Flaky sea salt (optional) – A light sprinkle on top adds a sweet-salty contrast that really makes the chocolate pop. It’s completely optional, but so good if you like that combination.
How to Make Fudgy Brownies
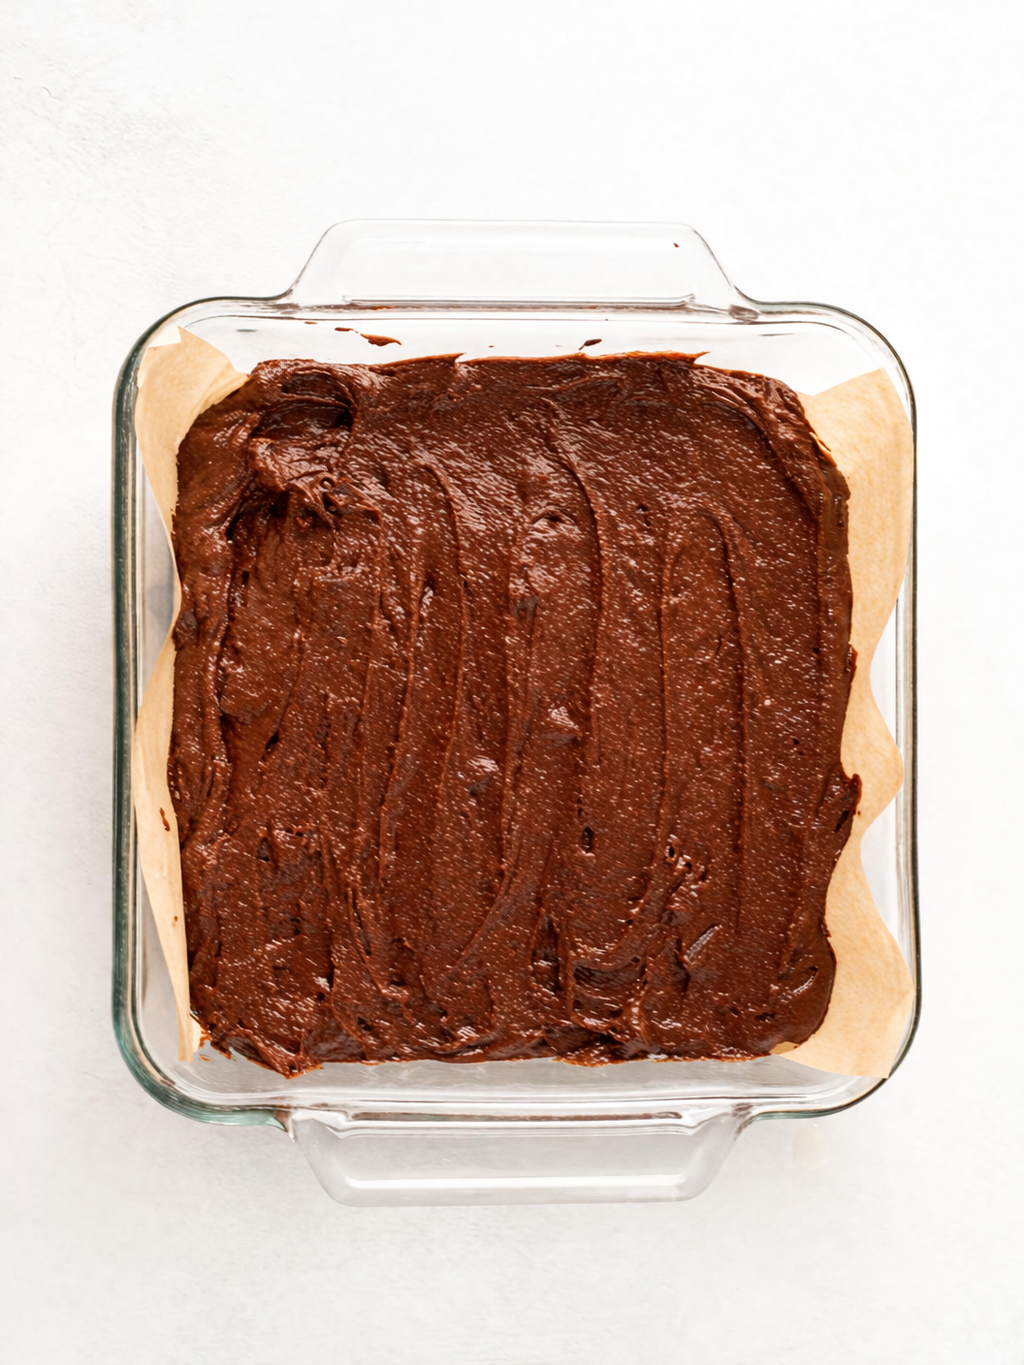
- Preheat your oven to 350°F. Line an 8×8 baking pan with parchment paper, leaving a little overhang so you can easily lift the brownies out later. If you’re using a glass pan, only preheat your oven to 325ºF.
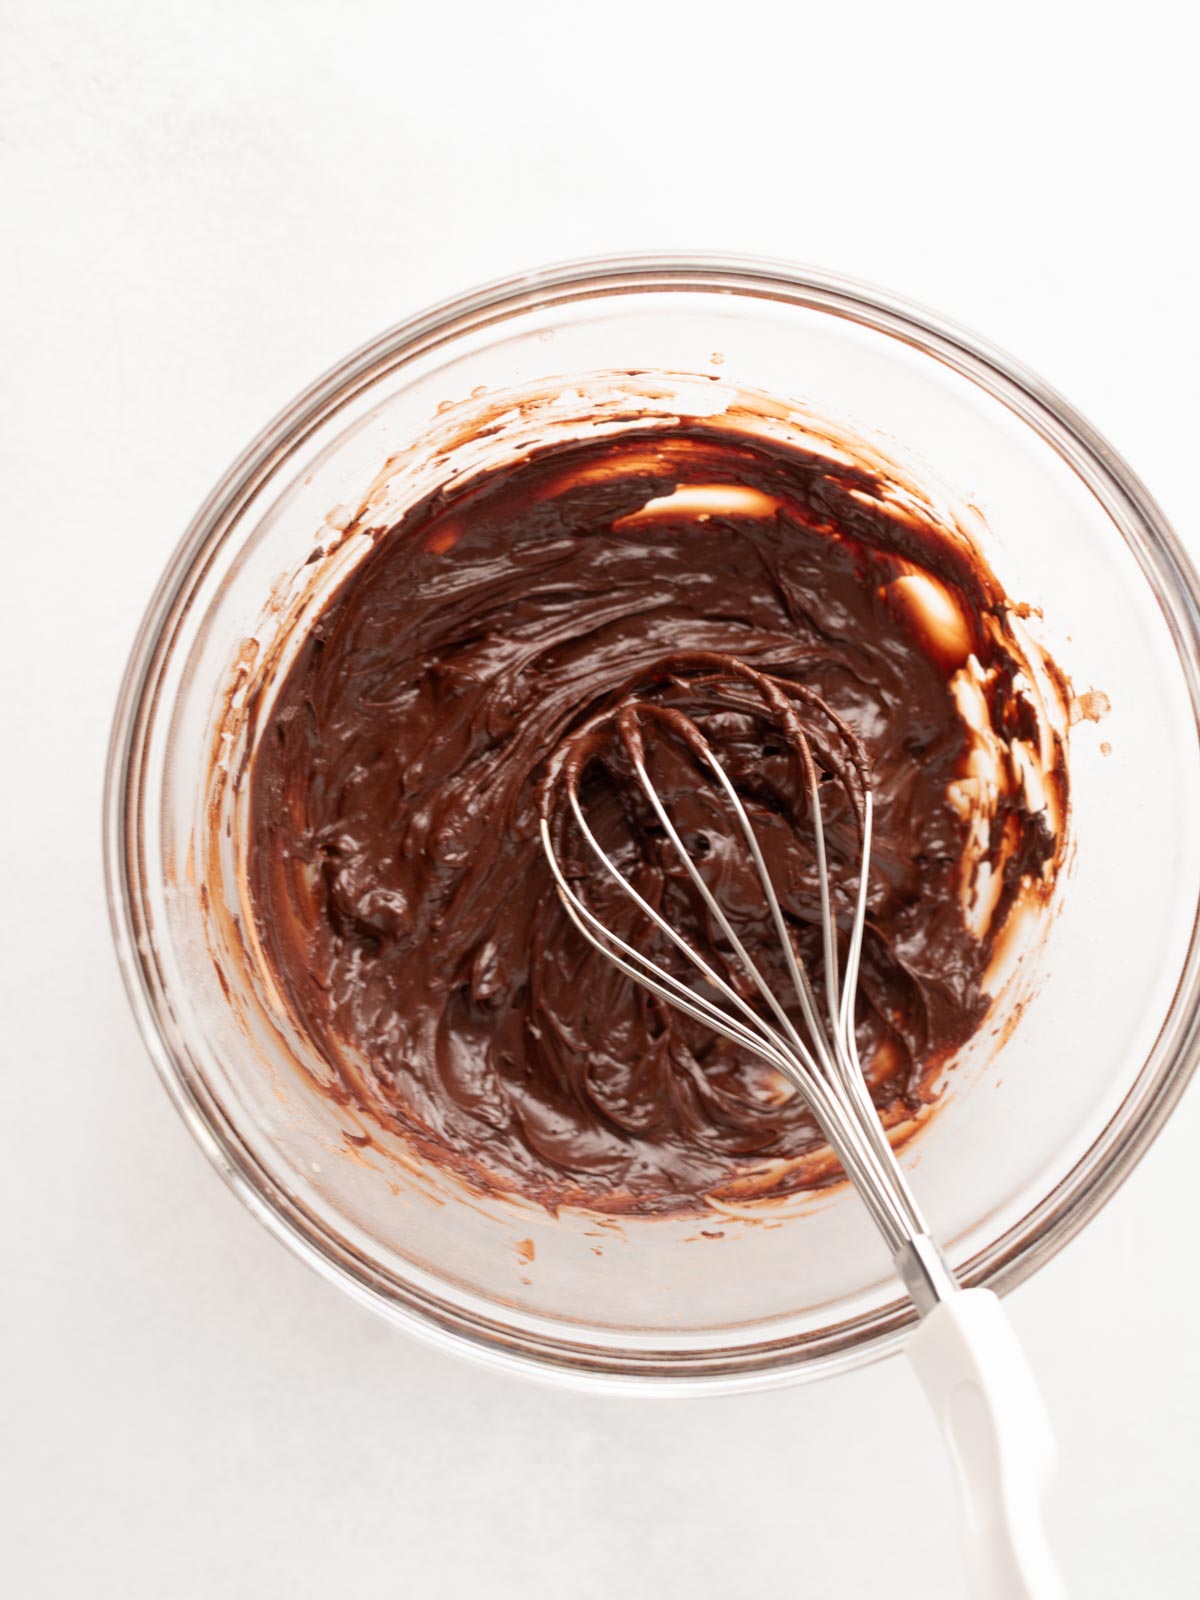
- In a large mixing bowl, add the melted butter, oil, and cocoa powder. While the butter is still warm, whisk everything together until smooth. This step actually helps bring out a deeper chocolate flavor.
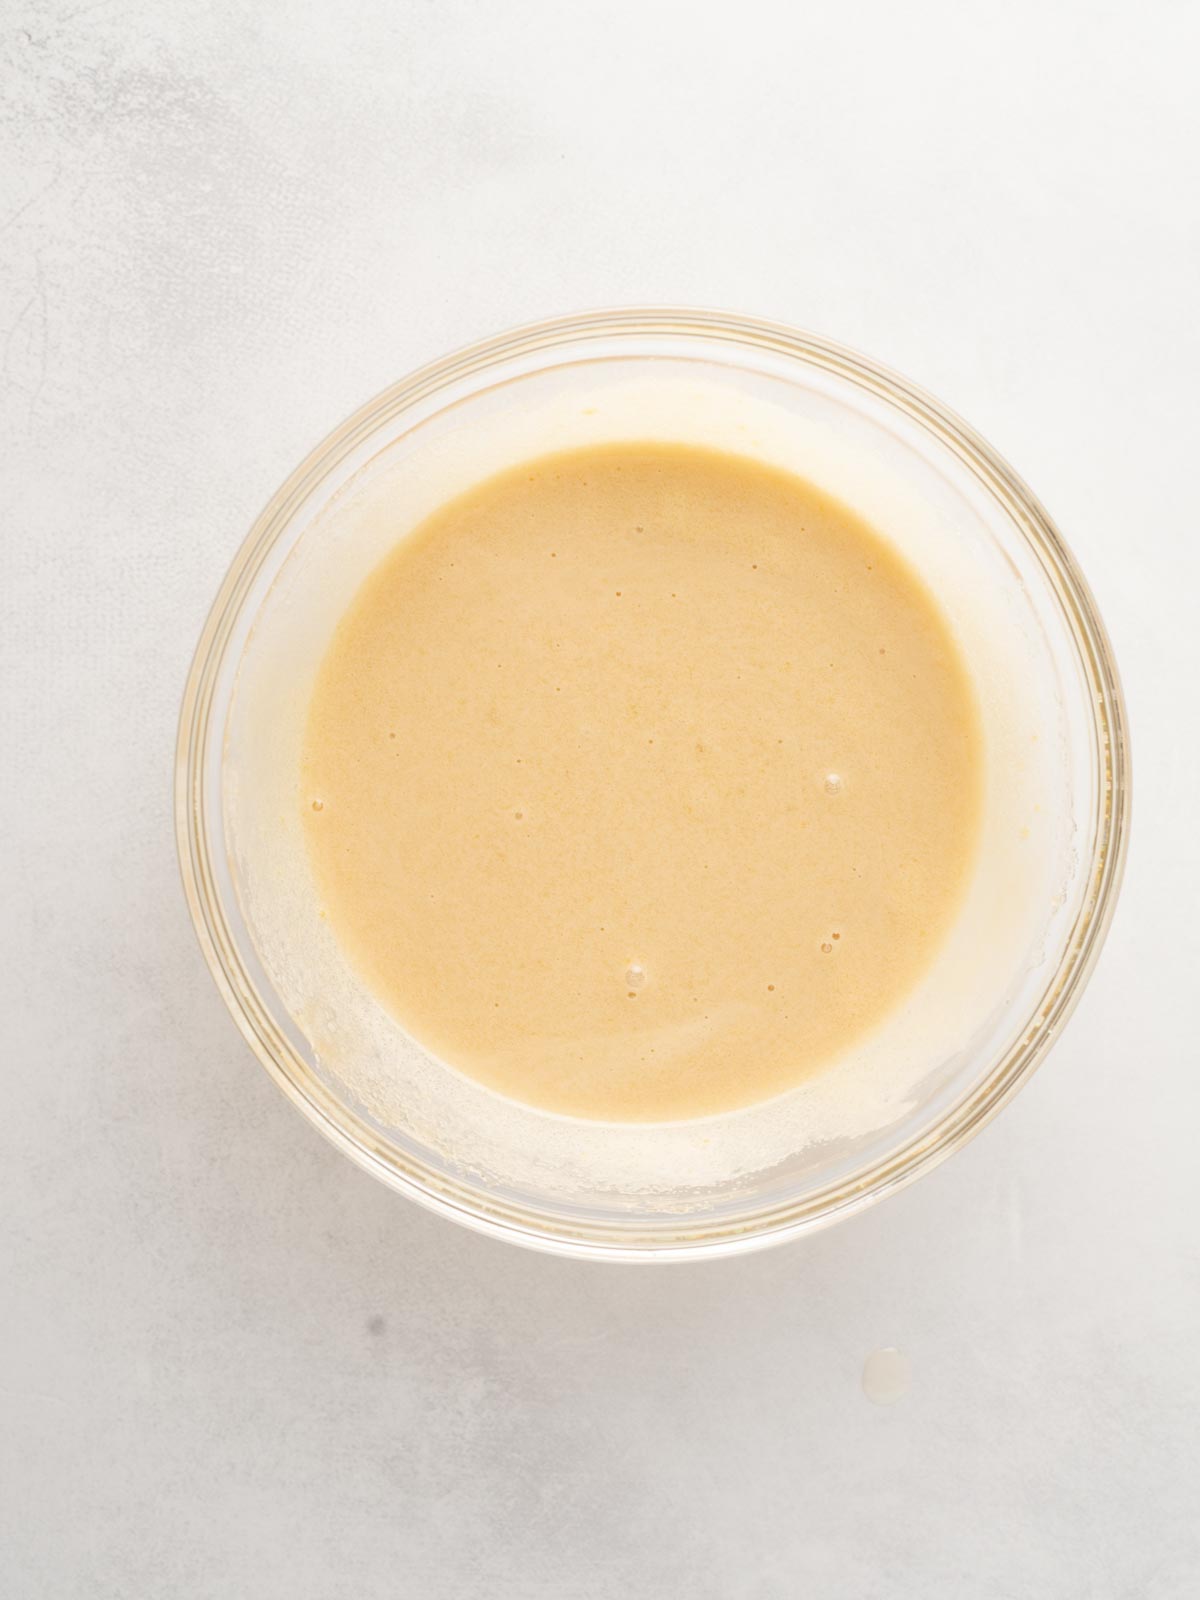
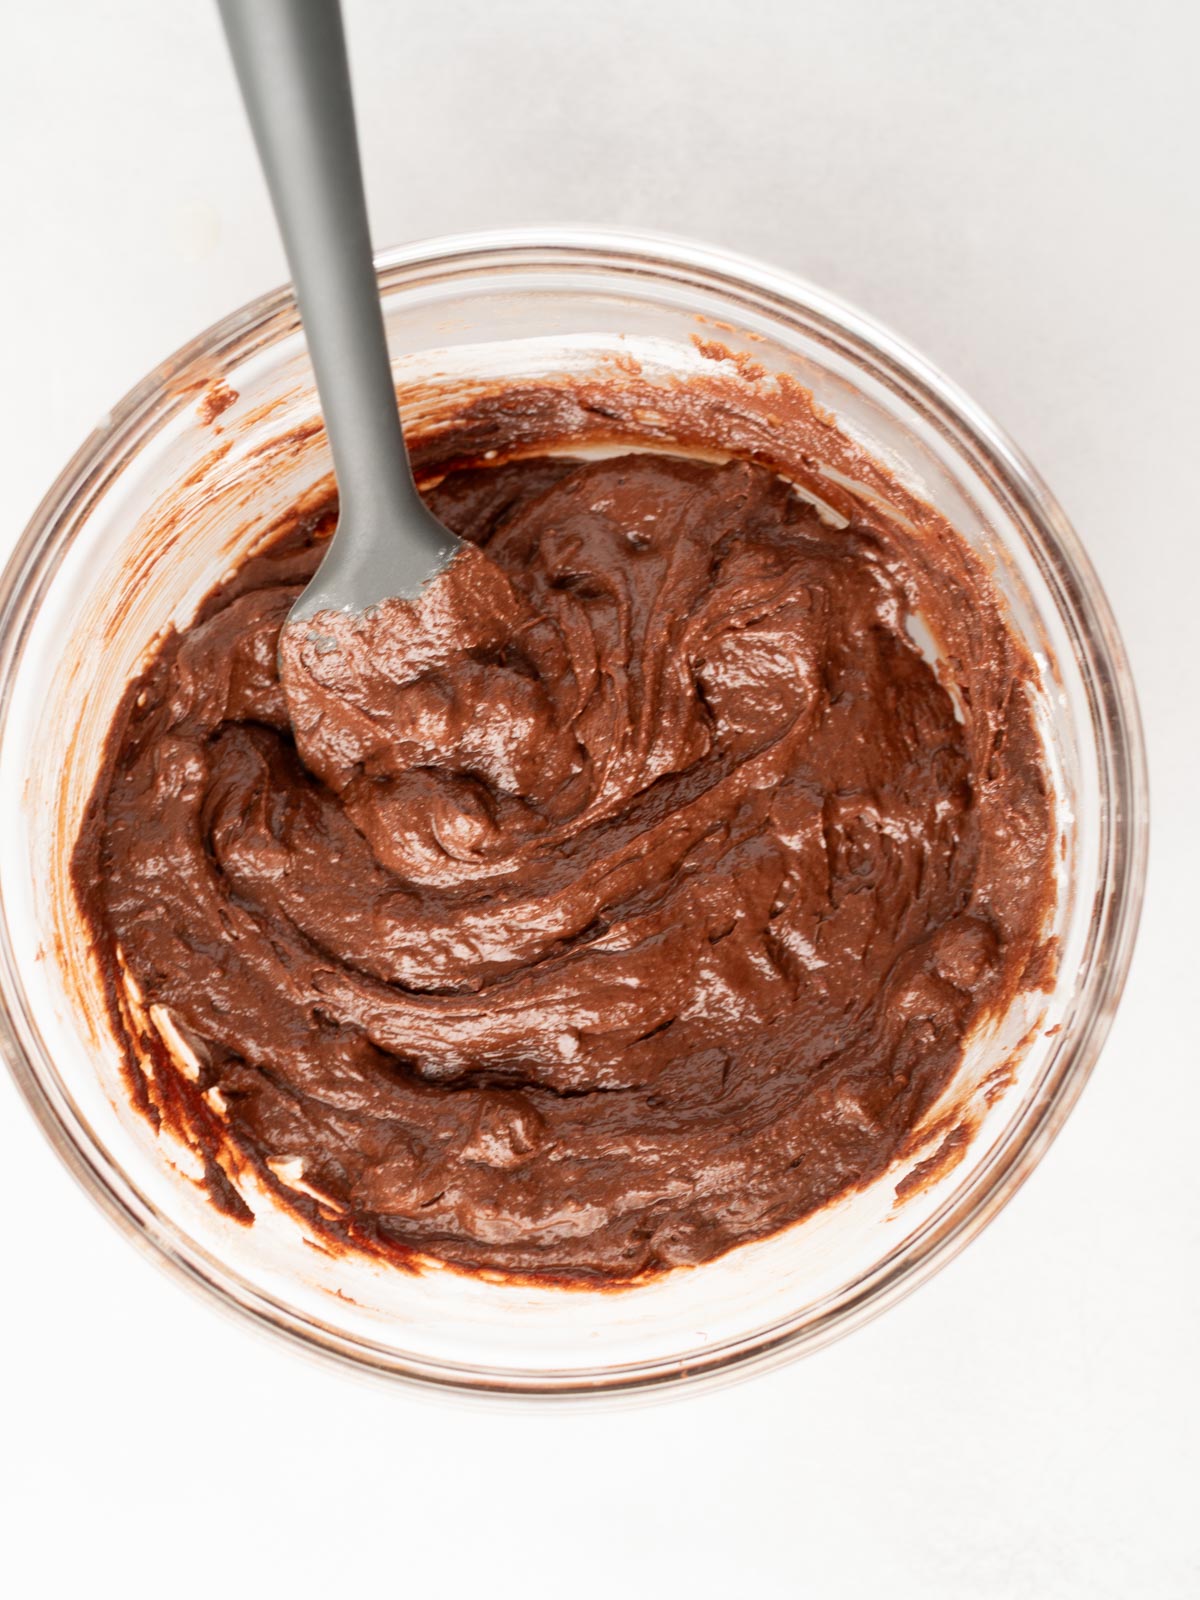
- In a separate bowl, whisk together the granulated sugar, brown sugar, eggs, and egg yolk for about 2–3 minutes. The mixture should look lighter in color and slightly thickened. This is what creates that shiny, crackly top.
- Pour the egg mixture into the cocoa mixture. Add the melted chocolate, vanilla extract, and espresso powder. Whisk until fully combined and smooth.

- Add the flour and salt. Using a spatula, gently fold everything together just until no dry flour streaks remain. Avoid overmixing here. That’s what keeps the brownies soft instead of tough.
- Fold in the chocolate chunks.
- Pour the batter into your prepared pan and spread it into an even layer.
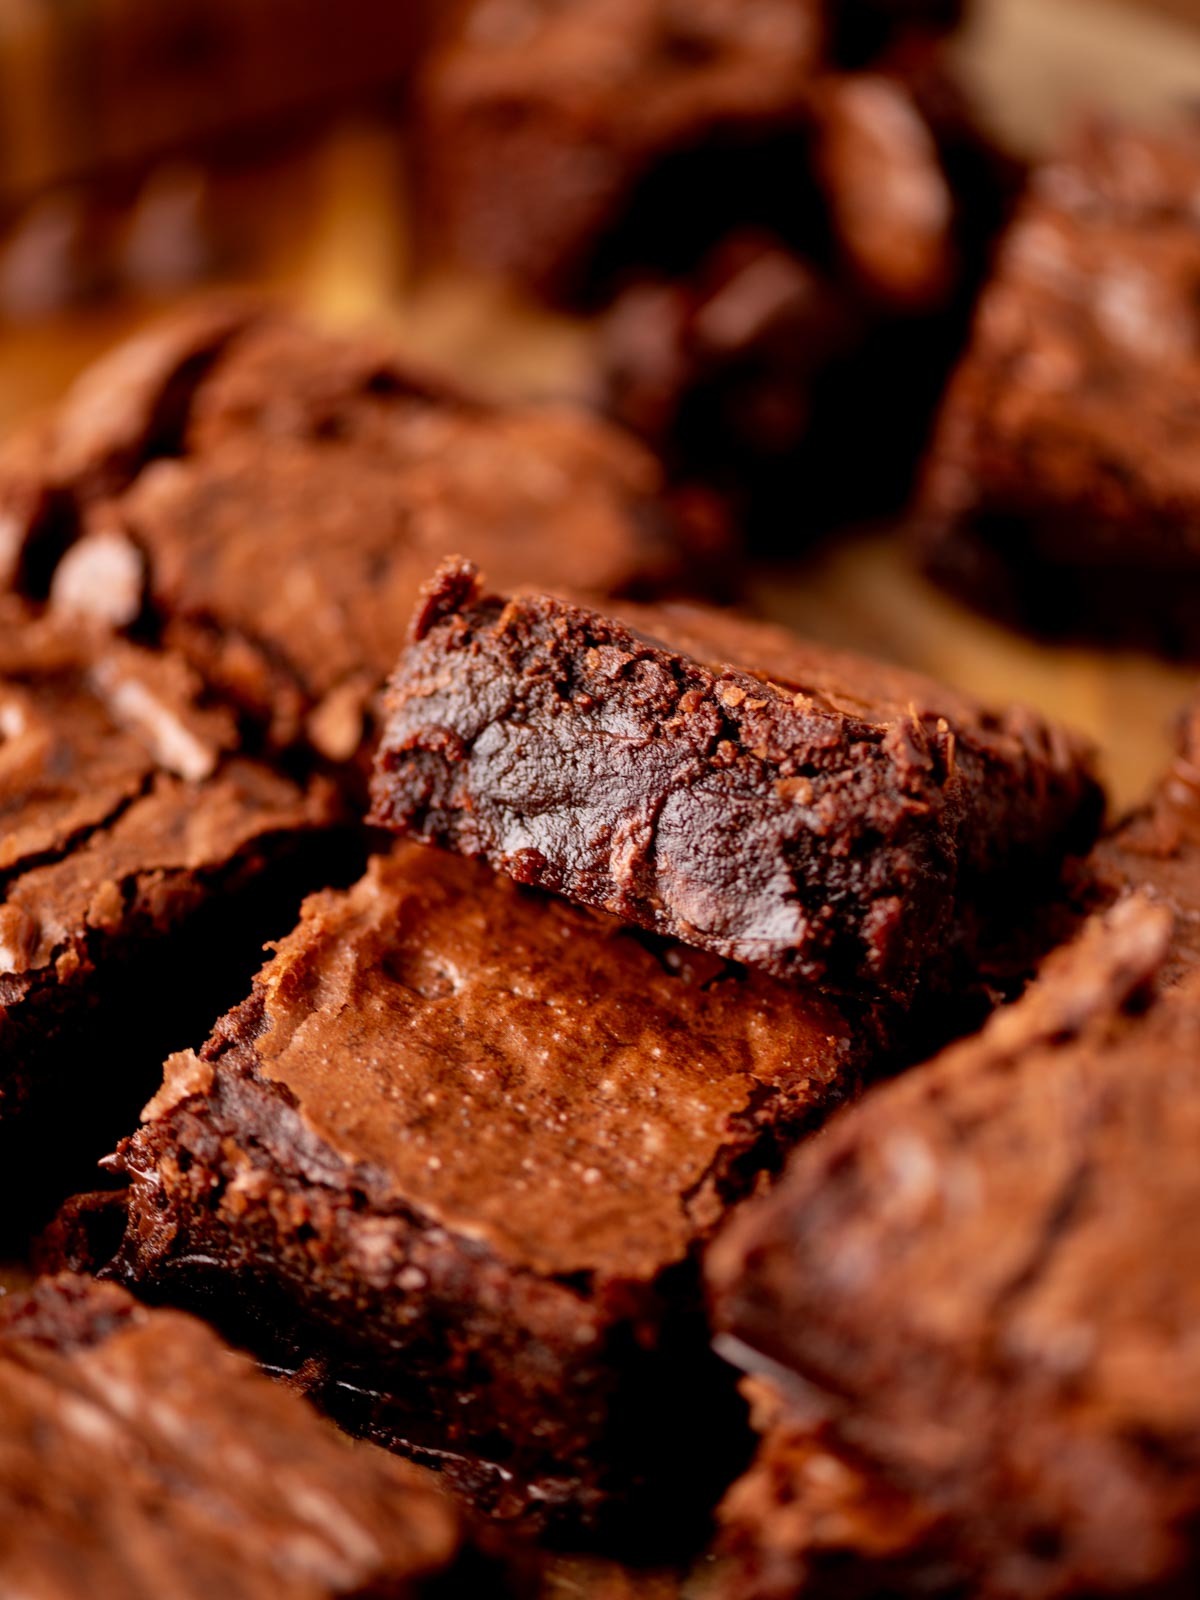
- Bake for 28–33 minutes if using a metal pan, or 32–38 minutes if using a glass pan. The edges should be set, and a toothpick inserted about 2 inches from the edge should come out with moist crumbs. The center will still be slightly soft. That’s exactly what you want.
- Let the brownies cool in the pan for at least 45 minutes before slicing. I actually wait about 2 hours before slicing to get perfect cuts. They will continue to set as they cool, giving you that perfect fudgy texture.
The Type of Pan Matters
The type of pan you use can completely change how your brownies bake, especially when it comes to getting that perfect fudgy center without overbaking the edges.
Metal pans (best choice)
Metal pans heat quickly and evenly, which helps the brownies bake through at the same rate from edge to center.
This is what gives you:
- chewy edges
- a soft, fudgy center
- a consistent texture all the way through
If you have a metal 8×8 pan, this is your best option for the most reliable results.
Glass pans
Glass pans heat more slowly and hold onto heat longer. That means the center takes longer to bake, but the pan keeps cooking the brownies even after you pull them out of the oven.
If you’re using a glass pan:
- Reduce the oven temperature to 325°F
- Expect a slightly longer bake time
- Check for doneness closer to the edges, not the center
This helps prevent the edges from overbaking while the center finishes setting.
Ceramic or stoneware pans
These behave similarly to glass but can bake even more unevenly. I would use these as a last resort.
They tend to:
- retain heat longer
- bake slower in the center
- overcook the edges if you’re not careful
If this is what you have, use the same adjustments as a glass pan and keep a close eye on your bake time.
Top Tip
The most important thing when making brownies is not overbaking them.
Brownies should still be slightly soft in the center when you take them out of the oven. They will continue to set as they cool in the pan.
How to Tell When Brownies Are Done
Knowing when to pull brownies out of the oven is what makes the difference between a soft, fudgy center and dry, overbaked edges.
Don’t test the center
It’s tempting to stick a toothpick right in the middle, but for fudgy brownies, the center will almost always look underdone, even when they’re ready.
Instead, insert a toothpick about 2 inches from the edge.
You’re looking for:
- Moist, fudgy crumbs → perfect
- Wet, liquid batter → needs more time
- Clean toothpick → overbaked
Look at the edges and top
The brownies should tell you they’re ready before the toothpick does.
- The edges should be set and may start to pull slightly away from the pan
- The top should look set with a thin, crackly layer
- The center should still be slightly soft, but not liquid
The center should have a slight jiggle
Give the pan a gentle shake.
- A slight jiggle in the center is exactly what you want
- If it sloshes, it’s not done
- If it doesn’t move at all, they may be overbaked
They finish setting as they cool
Brownies continue to cook in the pan after you take them out of the oven, especially if you’re using a glass or ceramic dish.
That’s why it’s better to pull them a little early than too late.
Let them cool for at least 45 minutes before slicing. This is what gives you that perfect fudgy texture.
Tips for the Best Brownies Every Time
- Whisk the eggs and sugar until glossy
Don’t rush this step. Whisking for a couple of minutes helps create that thin, crackly top and gives the brownies structure without making them cakey. - Mix gently once you add the flour
Overmixing is what turns brownies tough instead of soft and fudgy. Fold just until the dry streaks disappear. - Use good quality chocolate
Since chocolate is the main flavor here, using a good semisweet or bittersweet chocolate makes a noticeable difference. - Don’t overbake
Brownies should be slightly underbaked when you pull them out. The center will continue to set as they cool, giving you that perfect fudgy texture. - Check doneness in the right spot
Always test about 2 inches from the edge, not the center. The center will still be soft even when the brownies are done. - Let them cool before slicing
This one is hard, but important. Cutting too soon makes them fall apart and seem underbaked, even when they’re perfect. I typically wait about 2 hours before slicing. - Line your pan with parchment
It makes removing and slicing the brownies so much easier. No sticking or breaking.
Brownie Variations & Substitutions
For extra gooey brownies
Bake on the lower end of the time range and let them cool completely before slicing. You can also add an extra handful of chocolate chunks for more melty pockets throughout.
For a more set, structured brownie
Bake a few minutes longer until the center is less soft. This gives you a firmer texture that’s easier to slice cleanly.
Use different types of chocolate
Semisweet and bittersweet give you a deeper, richer flavor. If you prefer a sweeter brownie, you can use milk chocolate for the chunks or part of the melted chocolate.
Dutch-process vs natural cocoa powder
Either will work here. Dutch-process will give you a smoother, more mellow chocolate flavor, while natural cocoa has a slightly sharper, more classic brownie taste.
Skip the espresso powder if needed
It won’t make the brownies taste like coffee, but if you prefer to leave it out, you can. The brownies will still be rich and chocolatey.
Add a flaky salt finish
A light sprinkle of flaky sea salt on top adds a sweet-salty contrast that really enhances the chocolate flavor. Completely optional, but a great finishing touch.
How to Store Brownies
At room temperature
Store brownies in an airtight container at room temperature for up to 4 days. This keeps them soft and fudgy without drying out. With this specific recipe, you don’t have to worry about them getting hard or dry.
In the refrigerator
If you prefer a firmer, denser texture, you can store them in the refrigerator for up to 1 week. Just know they’ll be more solid when chilled, but they’ll still taste great.
To freeze
Let the brownies cool completely, then cut into squares. Wrap each piece tightly in plastic wrap and place them in a freezer-safe container or bag. Freeze for up to 2 months for the best flavor.
To thaw from frozen
Let brownies sit at room temperature for about 1–2 hours, or warm them slightly in the microwave for that fresh-from-the-oven texture.

Frequently Asked Questions
If your brownies are coming out too gooey, they likely needed a few more minutes in the oven. You’re looking for moist crumbs on a toothpick inserted about 2 inches from the edge, not wet batter. Keep in mind, the center will still be soft, but shouldn’t be liquid.
Dry brownies are almost always the result of overbaking. Even a few extra minutes can take them from fudgy to dry. It’s best to pull them out when the center is still slightly soft, as they will continue to set while cooking.
That shiny, crackly top comes from properly whisking the eggs and sugar. If this step is skipped or rushed, the top won’t form the same way.
Yes, but you’ll need to make a small adjustment. Reduce the oven temperature to 325ºF and expect a slightly longer bake time. Glass pans hold heat longer, so checking for doneness near the edges is key. (See the pan section above for full details.)
Yes. Brownies continue to set in the pan as they cool, especially in glass or ceramic pans. That’s why it’s important to pull them out while the center is still slightly soft.
You can. The espresso powder doesn’t make the brownies taste like coffee (AT ALL). It simply enhances the chocolate flavor. If you prefer to leave it out, the brownies will still turn out great.
Semisweet or bittersweet chocolate works best for a rich, balanced flavor. You can use milk chocolate if you prefer a sweeter brownie, but it will be less intense.
There are two easy tricks to getting clean slices with brownies every single time. First, let the brownies cool completely before cutting. Second, use a plastic knife. Yep, just a disposable plastic knife works fantastically.
More Easy Dessert Recipes You Might Like
Pin this now to find it later
Pin ItBrownies from Scratch
Ingredients
- ½ cup unsalted butter melted
- 2 tablespoons neutral oil vegetable or canola
- 1 cup granulated sugar
- ½ cup light brown sugar packed
- 2 large eggs
- 1 egg yolk
- 2 teaspoons vanilla extract
- ¾ teaspoon espresso powder
- ½ cup unsweetened cocoa powder
- 4 ounces semisweet or bittersweet chocolate melted
- ¾ cup all-purpose flour
- ½ teaspoon salt
- ¾ cup chocolate chunks or chips
- Flaky sea salt optional
Instructions
- Preheat oven to 350°F. Line an 8×8 pan with parchment paper.
- In a large bowl, whisk together melted butter, oil, and cocoa powder until smooth.
- In a separate bowl, whisk granulated sugar, brown sugar, eggs, and egg yolk for 2–3 minutes until lighter in color and glossy.
- Pour the egg mixture into the cocoa mixture. Add melted chocolate, vanilla, and espresso powder. Whisk until smooth.
- Add flour and salt. Gently fold until just combined. Do not overmix.
- Fold in chocolate chunks.
- Pour batter into prepared pan and spread evenly.
- Bake 28–33 minutes, until edges are set and a toothpick inserted 2 inches from the edge shows moist crumbs. Center should still be slightly soft.
- Cool at least 45 minutes before slicing. Sprinkle with flaky salt if desired.
Notes
- Do not overbake: the center should still be slightly soft when removed from the oven. Brownies will continue to set as they cool.
- Glass or ceramic pans: reduce oven temperature to 325°F and bake 32–38 minutes.
- For extra fudgy brownies: bake closer to the lower end of the time range.
- For clean slices: let brownies cool completely and use a plastic knife for smooth cuts.
Nutrition
Nutrition information is automatically calculated, so should only be used as an approximation.